
WordPress (this blog) is constantly being brute forced by bots that scan the internet looking for weak passwords. I wanted to better visualize these attempts. Here’s how I did it with Splunk.
What you need
- A blog running WordPress.
- The WordPress Wordfence plugin – the free version is good enough. One of its many features is to monitor for brute force attempts and lock out the offending IP address for a period of time. When a lockout happens, it sends an email.
- A Gmail address dedicated to alerts from Wordfence. Good thing accounts are free.
- A running Splunk instance. Splunk is free for up to 500MB of logs captured/day.
Gmail and WordFence
First, set up a Gmail address dedicated to receiving the alerts from WordFence. You can follow one of two approaches:
- Send the alerts directly do this dedicated email addres.
- Send the alerts to your primary email address, then create a rule to forward just the lockout notifications to your dedicated alerts email address.
I chose the second option because I wanted to see some of the other alerts that WordFence generates, such as when an admin logs in. My forwarding rule in Gmail looks like:
Matches: from:(word
Next, set up WordFence on your blog. Once installed, take some time and poke around. The default settings work great but you might want to tweak some stuff, and it’s nice to know all the features the plugin provides. Then configure the settings needed for this project under WordFence -> Options:
- Enable Rate Limiting and Advanced Logging – checked
- Where to email alerts – enter the email address where you want alerts sent
- Alert when an IP address is blocked – checked
Splunk
We’re going to use the IMAP Mailbox app for Splunk to connect to the alert mailbox and pull it down. First, download and install it from here: https://splunkbase.splunk.com/app/1739/ There are install instructions linked from that page if you don’t want to follow mine.
After it is installed, run through the web based setup by going to the app in the Splunk GUI. Don’t worry too much about these settings because you’re going to configure most of it at the command line. But running through this will record that the app has gone through its first setup and is enabled.
Now, configure it to connect to your mailbox. SSH into your Splunk server and edit the file /opt/splunk/etc/apps/IMAPmailbox/local/imap.conf. Edit it to look like this:
[IMAP Configuration]
debug = 0
deleteWhenDone = 1
disabled = 0
fullHeaders = 0
includeBody = 1
noCache = 0
server = imap.gmail.com
useSSL = 1
user = <alert email address here>@gmail.com
password = <password here>
splunkuser = admin
splunkpassword = <password here>
folders = INBOX
The folders=INBOX line is important because of Gmail’s tagging. This line tells the app to only pull in messages that have the Inbox tag. Without it, duplicate messages will be imported.
Then, restart your Splunk service to start the polling.
The last bit is regex to tell Splunk how to extract the interesting fields from these alert emails. Go to Settings -> Fields -> Field Extractions and add four new ones in the IMAPmailbox app:
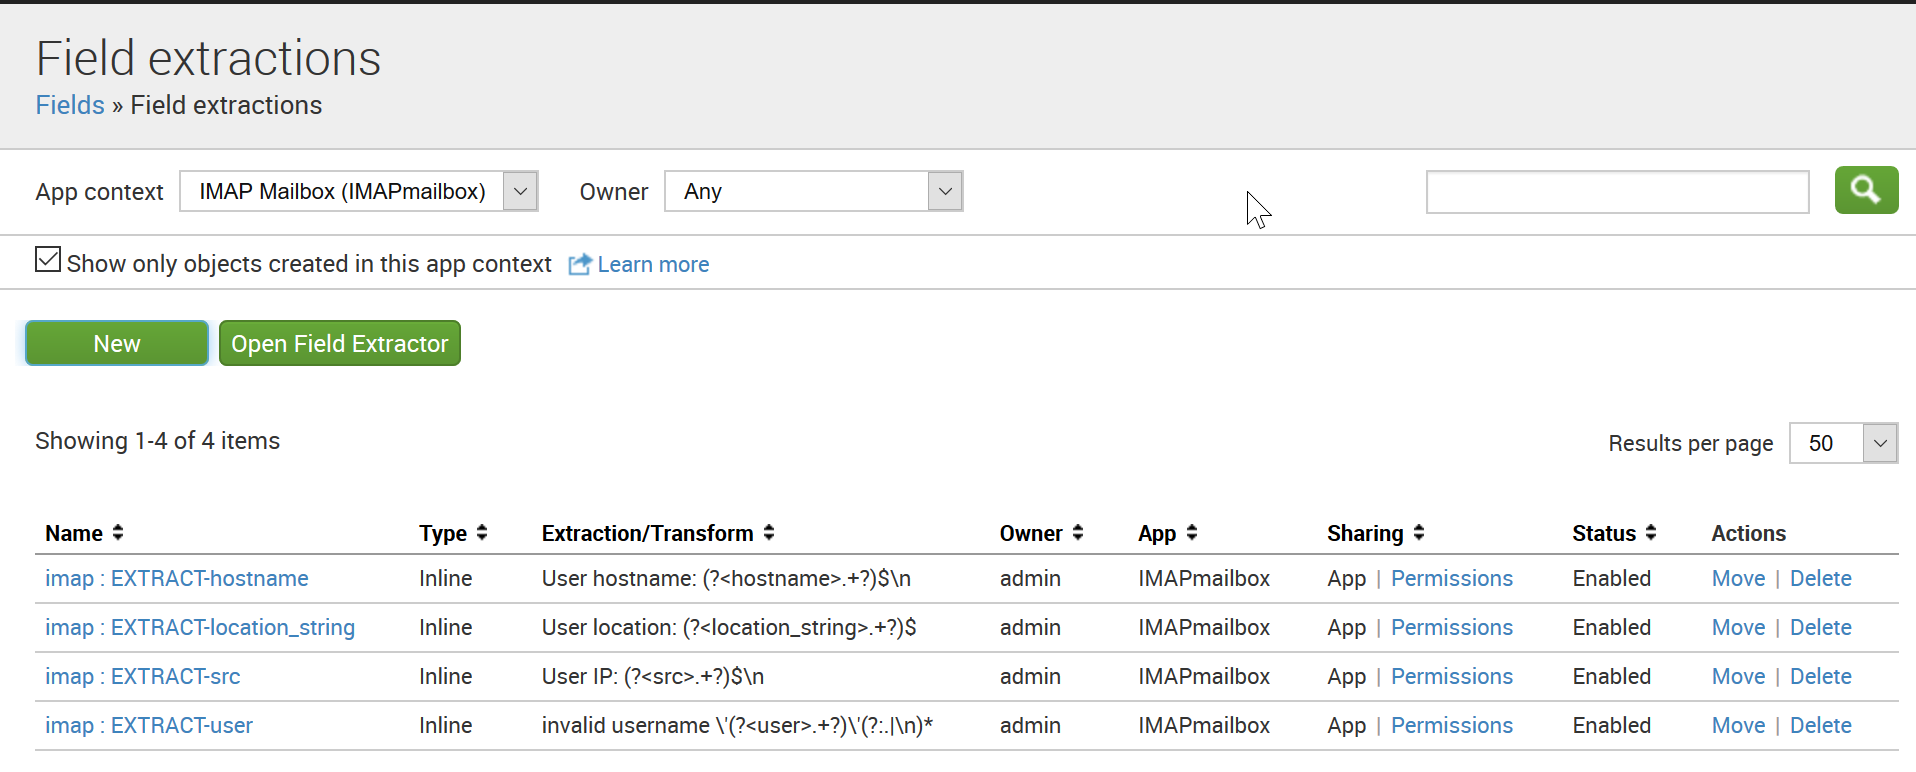 Text of the extraction regex for your copy/paste pleasure:
User hostname: (?<hostname>.+?)$\n
User location: (?<location_string>.+?)$
User IP: (?<src>.+?)$\n
invalid username \'(?<user>.+?)\'(?:.|\n)*
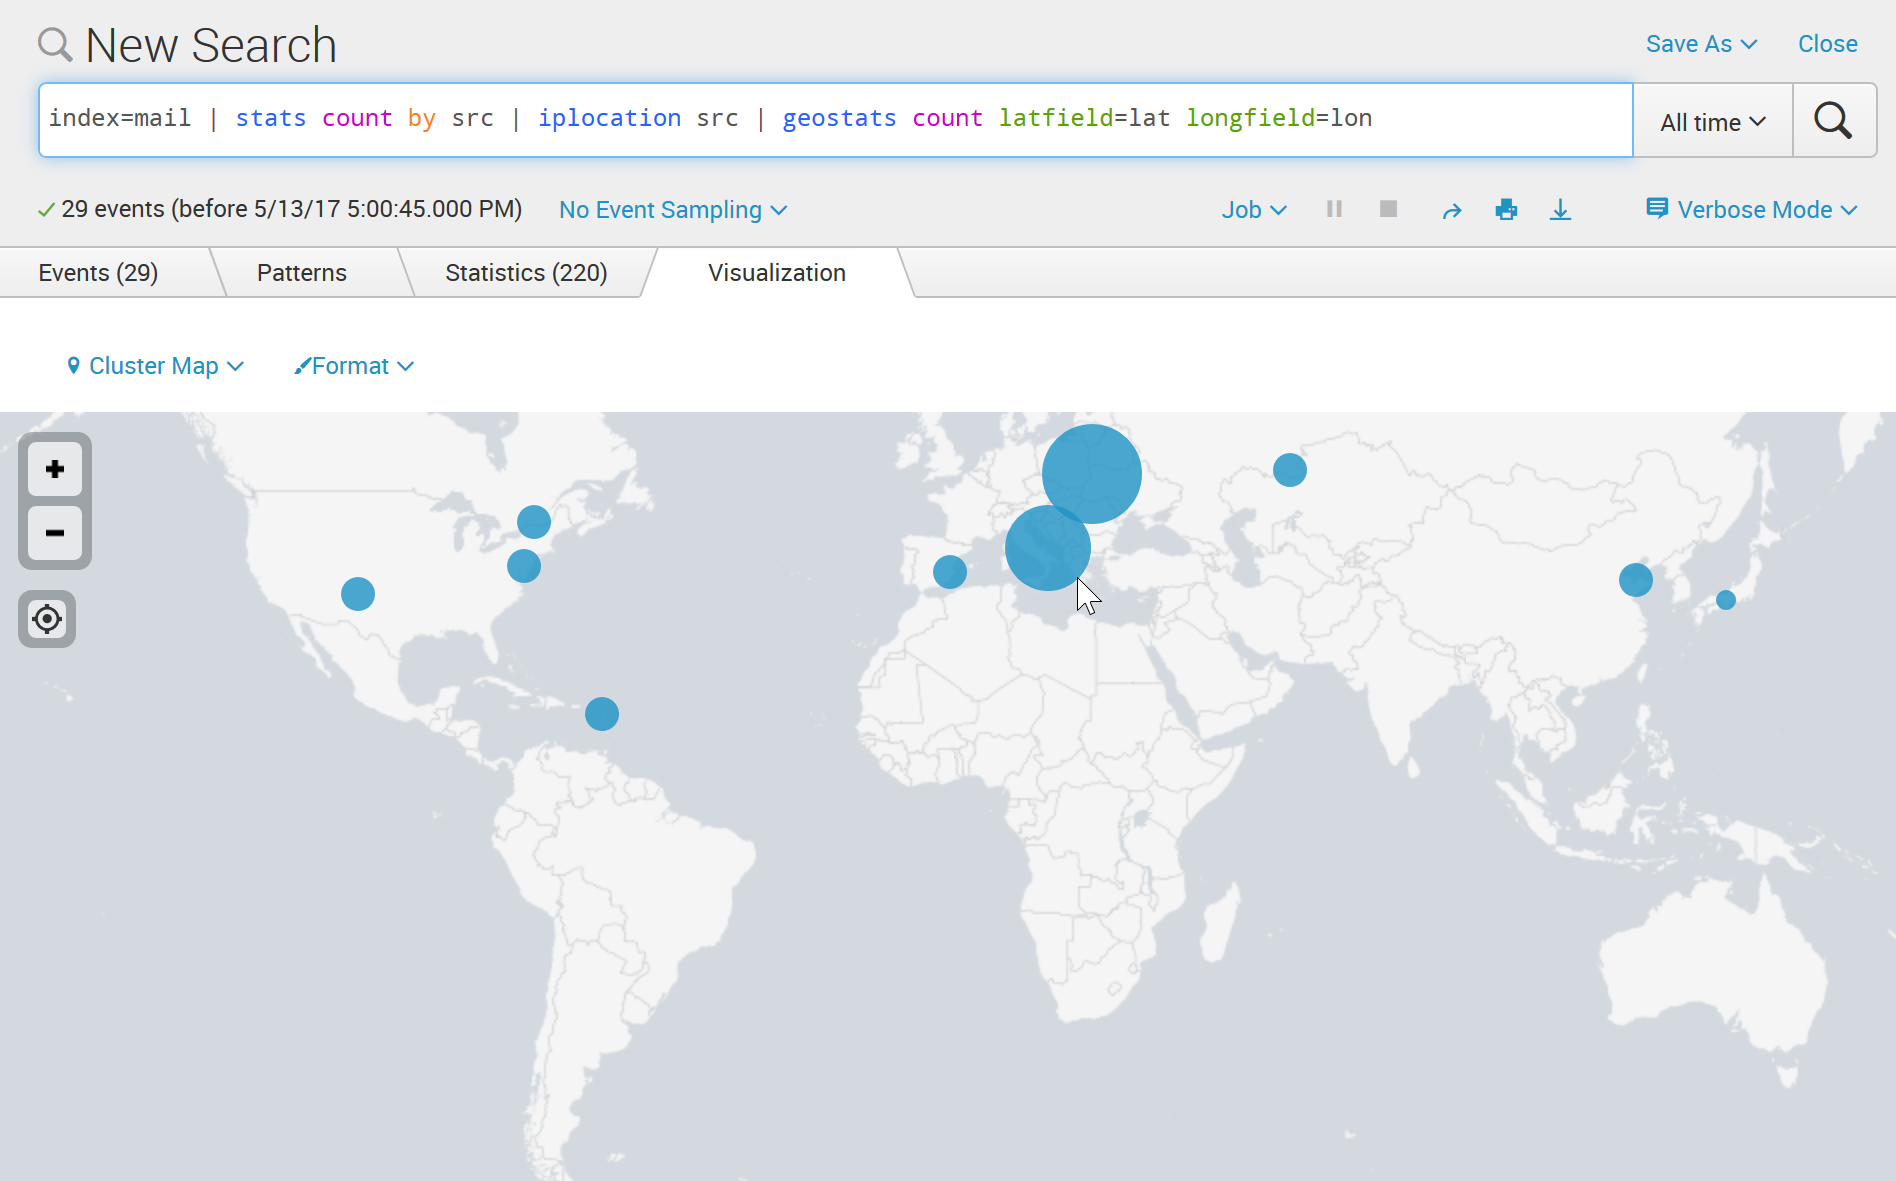
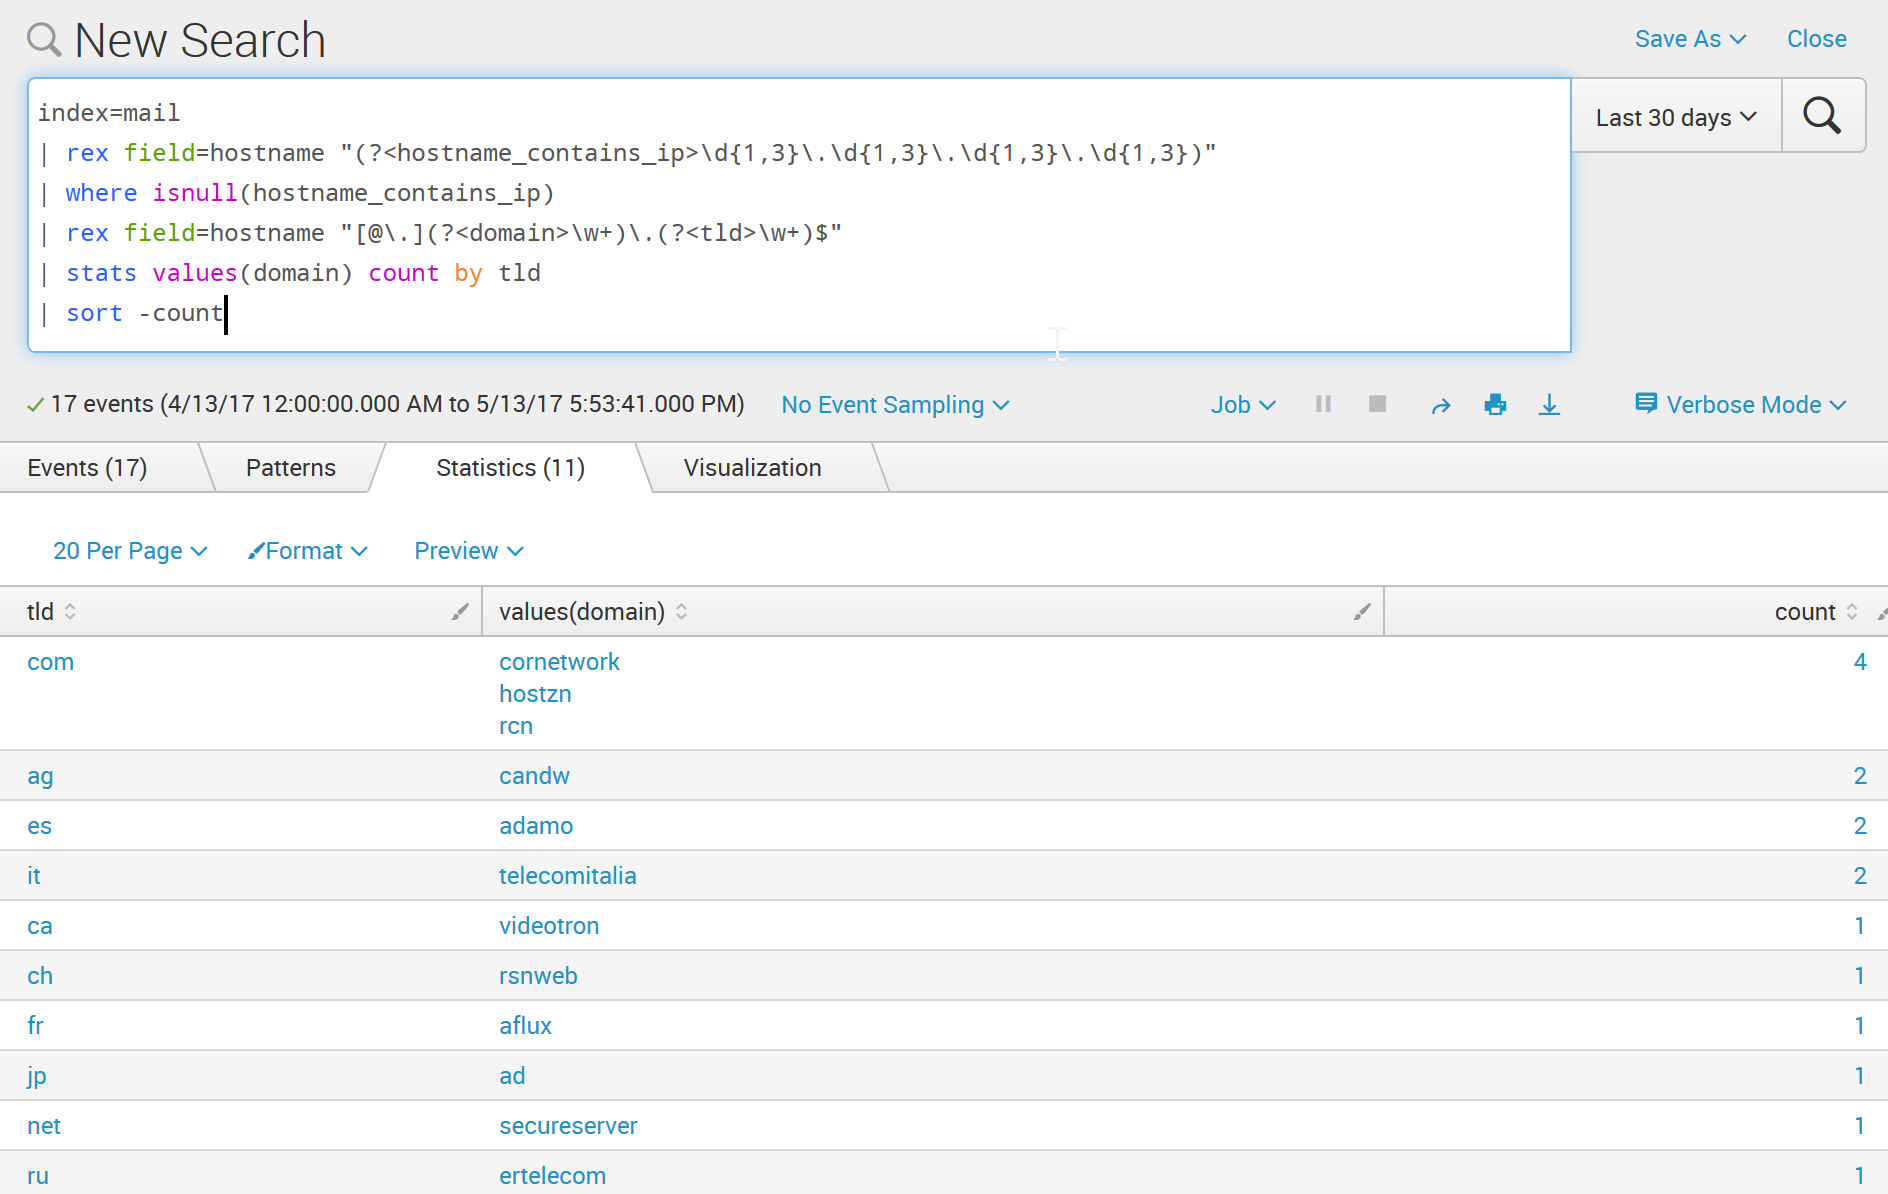
Results
After you accumulate some lockouts, you can run stats on the data.
Top abused usernames
index=mail
| stats count by user
| sort -count

Cluster map of source IP addresses
index=mail
| iplocation src
| geostats count latfield=lat longfield=lon
Count by TLD of hostname
index=mail
| rex field=hostname "(?<hostname_contains_ip>\d{1,3}\.\d{1,3}\.\d{1,3}\.\d{1,3})"
| where isnull(hostname_contains_ip)
| rex field=hostname "[@\.](?<domain>\w+)\.(?<tld>\w+)$"
| stats values(domain) count by tld
| sort -count
Now I want more brute force attempts on the blog so I have more data to play with! 🙂 You probably shouldn’t take that as an invitation though…
If you come up with any interesting queries on this data, let me know in the comments!