
I’m always looking for ways I can add layers of encryption and security to my network and I recently came across the DNSCrypt project created by OpenDNS. This toolset and infrastructure encrypts DNS queries from your machine or network so that your ISP can’t snoop on them. I decided to set up dnscrypt-proxy as a forwarder on my home router so that all DNS traffic leaving my network is encrypted.
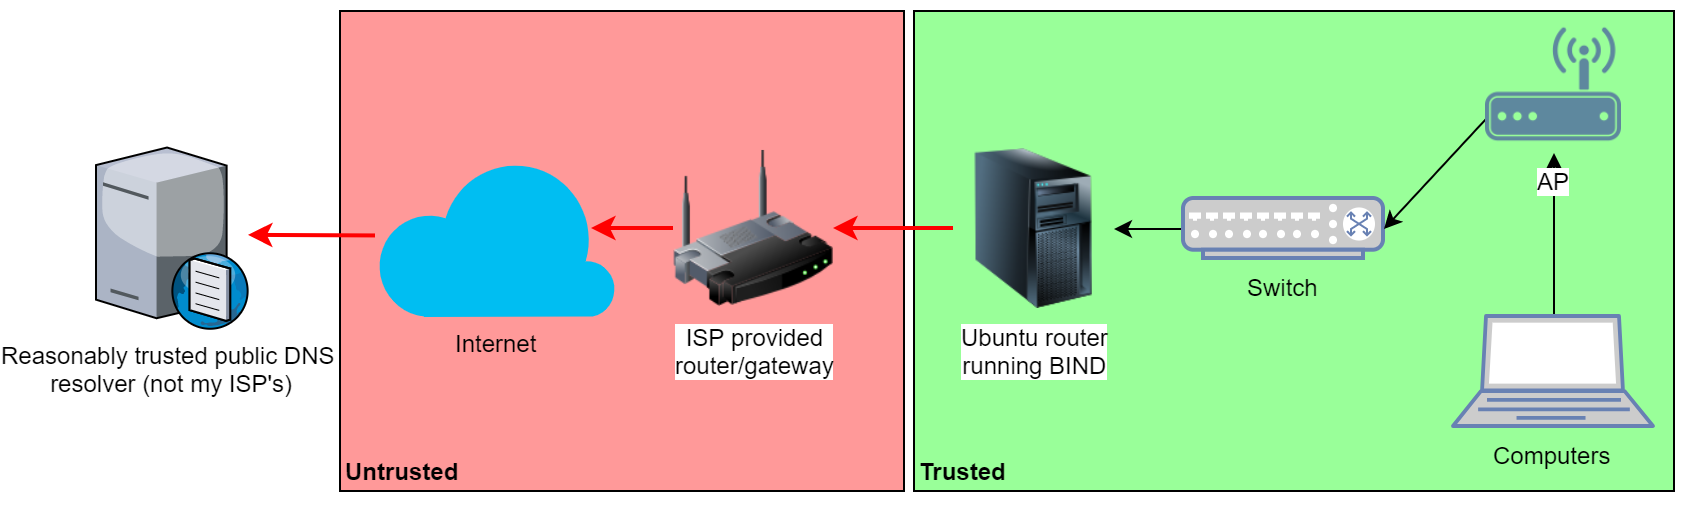
I run BIND on my Ubuntu-based mini-PC router. A rough diagram of how DNS queries flow through my network is below, where green indicates a trusted zone or encrypted link, and red indicates untrusted/unencrypted.
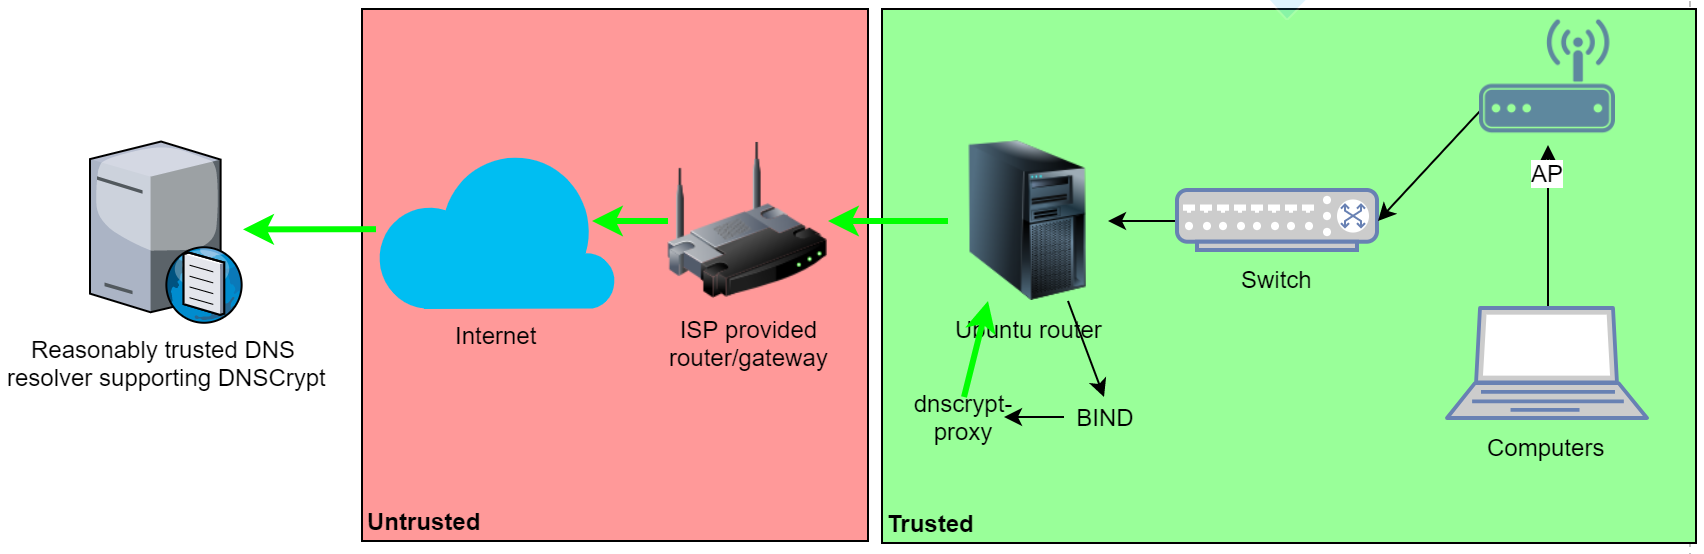
 My goal is to insert dnscrypt-proxy into the DNS query flow to encrypt all queries along as they transit the untrusted zone. What we will end up with is this:
dnscrypt-proxy Installation and First Run
Installation and startup is easy:
apt install dnscrypt-proxy
systemctl start dnscrypt-proxy
Check to make sure it is running and determine which IP/port it listens on:
$ lsof -i -n | grep dnscrypt
dnscrypt- 27114 _dnscrypt-proxy 3u IPv4 15407729 0t0 TCP 127.0.2.1:domain (LISTEN)
dnscrypt- 27114 _dnscrypt-proxy 4u IPv4 15407730 0t0 UDP 127.0.2.1:domain
By default dnscrypt is configure to use the OpenDNS/Cisco resolver and I suggest you keep using it during setup because they offer a nifty utility to validate you are dnscrypt enabled. You can change it after you know everything works, if you want. Check the IP address of the resolver in use using:
$ systemctl status dnscrypt-proxy
dnscrypt-proxy.service - DNSCrypt proxy
Loaded: loaded (/lib/systemd/system/dnscrypt-proxy.service; enabled; vendor preset: enabled)
Active: active (running) since Sun 2017-12-10 15:50:23 EST; 10s ago
Docs: man:dnscrypt-proxy(8)
Main PID: 27857 (dnscrypt-proxy)
Tasks: 1
Memory: 260.0K
CPU: 17ms
CGroup: /system.slice/dnscrypt-proxy.service
└─27857 /usr/sbin/dnscrypt-proxy --resolver-name=cisco

Dec 10 15:50:23 duchess dnscrypt-proxy[27857]: [WARNING] - [cisco] logs your activity - a different provider might be better a choice if privacy is a concern
Dec 10 15:50:23 duchess dnscrypt-proxy[27857]: [NOTICE] Starting dnscrypt-proxy 1.6.1
Dec 10 15:50:23 duchess dnscrypt-proxy[27857]: [INFO] Done
Dec 10 15:50:23 duchess dnscrypt-proxy[27857]: [INFO] Server certificate #1490391488 received
Dec 10 15:50:23 duchess dnscrypt-proxy[27857]: [INFO] This certificate is valid
Dec 10 15:50:23 duchess dnscrypt-proxy[27857]: [INFO] Chosen certificate #1490391488 is valid from [2017-03-25] to [2018-03-25]
Dec 10 15:50:23 duchess dnscrypt-proxy[27857]: [INFO] Server key fingerprint is E7F8:4477:BF89:1434:1ECE:23F0:D6A6:6EB9:4F45:3167:D71F:80BB:4E80:A04F:F180:F778
Dec 10 15:50:23 duchess dnscrypt-proxy[27857]: [NOTICE] Proxying from 127.0.2.1:53 to 208.67.220.220:443
Dec 10 15:50:23 duchess systemd[1]: Started DNSCrypt proxy.
If you want to see that your queries are not leaving in plain text, use tcpdump:
tcpdump -i enp2s0 -A host 208.67.220.220
Run this test query which will return the IP of the resolver you have chosen, in this case Opendns/Cisco:
hostip -r 127.0.0.1 resolver.dnscrypt.org
And this query which will give some more details about the setup plus confirm that you are using dnscrypt from the local machine:
$ dig debug.opendns.com txt

; <<>> DiG 9.10.3-P4-Ubuntu <<>> debug.opendns.com txt
 ;; global options: +cmd
 ;; Got answer:
 ;; ->>HEADER<<- opcode: QUERY, status: NOERROR, id: 33886
 ;; flags: qr rd ra; QUERY: 1, ANSWER: 6, AUTHORITY: 13, ADDITIONAL: 5

;; OPT PSEUDOSECTION:
 ; EDNS: version: 0, flags:; udp: 4096
 ;; QUESTION SECTION:
 ;debug.opendns.com. IN TXT

;; ANSWER SECTION:
 debug.opendns.com. 0 IN TXT "actype 0"
 debug.opendns.com. 0 IN TXT "source 108.52.34.196:50221"
 debug.opendns.com. 0 IN TXT "server m61.ash"
 debug.opendns.com. 0 IN TXT "flags 20 0 70 7950800000000000000"
 debug.opendns.com. 0 IN TXT "dnscrypt enabled (713156774457306E)"
 debug.opendns.com. 0 IN TXT "originid 0"
You should see some gibberish come across in your tcpdump window. Success!
Configure BIND to Forward to dnscrypt-proxy
Once BIND is configured as a forwarder, all clients on the network will have their queries transparently forwarded through dnscrypt without any changes required on the endpoints themselves. Edit /etc/bind/named.conf.options and add a forwarders block:
options {
    ...
    forwarders {
        127.0.2.1;
    };
    ...
};
Restart BIND (systemctl restart bind9) and do another test query from a different machine on the network. You should see some more gibberish come across your tcpdump window and the query should return successfully. Success! Before we forget, make sure dnscrypt-proxy starts on every boot:
systemctl enable dnscrypt-proxy
Change dnscrypt Resolver and Other Config
Last, you’ll want to choose a dnscrypt resolver that you trust. The current list of resolvers is here: https://dnscrypt.org/dnscrypt-resolvers.html Once you have chosen one, edit /etc/default/dnscrypt-proxy.conf and change DNSCRYPT_PROXY_RESOLVER_NAME.
You should also review the man page for dnscrypt-proxy and see if there are other options you want to configure. I added “-E” to DNSCRYPT_PROXY_OPTIONS so that a new key is generated for every query. I am not concerned about query performance because my little router does very little work.
Restart dnscrypt-proxy and check to see that the new resolver’s IP address is listed in `systemctl status dnscrypt-proxy`. If it is, you are done! Now all your DNS traffic is encrypted and protected from your ISP’s snooping.